Create a new application
Creating a new c2cgeoportal application is done by applying two Paste skeletons
(a.k.a. templates and scaffolds). These skeletons are provided by the
c2cgeoportal package. So to be able to create a c2cgeoportal application
the c2cgeoportal package must be installed.
If you already have a c2cgeoportal application installed, and if that application uses a version of c2cgeoportal that fits you, then you do not need to install c2cgeoportal again. Instead, you can use the version of c2cgeoportal that is already alongside the existing c2cgeoportal application.
Note
Some c2cgeoportal applications provide their own skeletons. For example a parent application may provide a skeleton for creating child applications. In that case, the c2cgeoportal skeletons, as well as the application skeletons, should be applied.
Project structure
In the simple case the root directory of the application is the directory
created by the c2cgeoportal skeletons (the c2cgeoportal_create and
c2cgeoportal_update skeletons). Projects following a parent/child
architecture may use a different structure. Here is an example of a structure
for a project composed of a main application and sub-applications:
<root>
  +- <main_project>
  +- <first_sub_project>
  +- <second_sub_project>
  +- ...
Here <root> is the root of the Git tree.
Install c2cgeoportal
This step is required if you cannot, or do not want, to create the c2cgeoportal
application from an existing one. For example, if you are creating a child
application from an existing parent application, it means you already have
c2cgeoportal installed, so you can just skip this section, and directly go
to the next.
Also, installing c2cgeoportal, as described in this section, requires
access to the c2cgeoportal GitHub repository. If you cannot view the
https://github.com/camptocamp/c2cgeoportal page in your browser that means you
do not have the required permissions. Please contact Camptocamp in that case.
To install c2cgeoportal you first need to clone the c2cgeoportal repository
from GitHub:
git clone https://github.com/camptocamp/c2cgeoportal.git cd c2cgeoportal
Then you should checkout the branch or tag of the version you want to install:
git checkout <branch|tag>
<branch|tag> can be 2.2 for the latest version of the 2.2 branch,
2.2.0 for the first stable 2.2 version.
Fetch the Git submodules:
git submodule update --init
Build c2cgeoportal:
./docker-run make build
List existing skeletons
To list the available skeletons/templates use the following command, either from the root directory of c2cgeoportal (if you have followed the instructions from the previous section), or from the root directory of the existing c2cgeoportal application you want to create the new application from:
./docker-run pcreate -l
You should at least see the c2cgeoportal skeletons:
- c2cgeoportal_create
- c2cgeoportal_update
Create the new application
The first step in the project creation is to chose a project name
<project>, and a package name <package>.
Normally the project name should be the same name as the Git repository name.
The package name should not contain an underscore (_) because of an
issue with Pip.
To create the application first apply the c2cgeoportal_create skeleton:
./docker-run pcreate -s c2cgeoportal_create <project>
Note
Do not add any ‘/’ after the project name.
You’ll be asked to enter the SRID and the Apache vhost for this project. Note that the default extent would be defined directly from the srid. You can change it later.
Note
You can define these informations directly in the command line using parameters:
SRID=21781 EXTENT="420000 30000 900000 350000" apache_vhost=<vhost> \
   ./docker-run pcreate -s c2cgeoportal_create --package-name <package> <project>
This will create a directory named <project> that will be next to the
c2cgeoportal directory, or to the directory of the application you are
creating this application from.
Now apply the c2cgeoportal_update skeleton:
SRID=21781 apache_vhost=<vhost> \
    ./docker-run pcreate -s c2cgeoportal_update --package-name <package> <project>
Note
Do not add any ‘/’ after the project name.
The c2cgeoportal_update scaffold is also used to update the
application. The files generated by this skeleton are prefixed with
CONST_, which means they are constant files that should not be changed.
Following this rule is important for easier updates.
Go to your new project:
cd ../<project>
Note
If this application is a child of a parent/child architecture you should
fill the parent_schema and the parent_instanceid in the
vars_<package>.yaml file.
In a parent/child architecture one instance of the application is the parent, the others are children. Child instances display layers served by the parent instance. Parent and child instances share the same database, but use dedicated schemas within that database.
Put the application under revision control
Now is a good time to put the application source code under revision control (Git preferably).
To add a new child in an existing repository
Add the project:
cd ..
git add <package>/
Add the CGXP submodule:
git submodule add git@github.com:camptocamp/cgxp.git <project>/<package>/static/lib/cgxp
git submodule foreach git checkout <version>
-b <version> forces to use the CGXP branch <version>.
Branches are available starting at version 1.3.
Commit and push on the main repository:
git commit -m "Initial commit of <project>"
git push origin master
To add a project in a new repository
Add the project:
git init
git add .
git remote add origin git@github.com:camptocamp/<project>.git
If you plan to use CGXP, add the CGXP submodule:
git submodule add https://github.com/camptocamp/cgxp.git <package>/static/lib/cgxp
git submodule foreach git checkout <version>
-b <version> forces to use the CGXP branch <version>.
Branches are available starting at version 1.3.
Commit and push on the main repository:
git commit -m "Initial commit"
git push origin master
Configuration of different environment in your project
Concepts
- Makefile: These files are environment configuration files. Each environment will have its configuration file (developer, preprod, prod)
- vars_xxx.yaml: These files are application configuration files. Generally only one file is needed to configure your application.
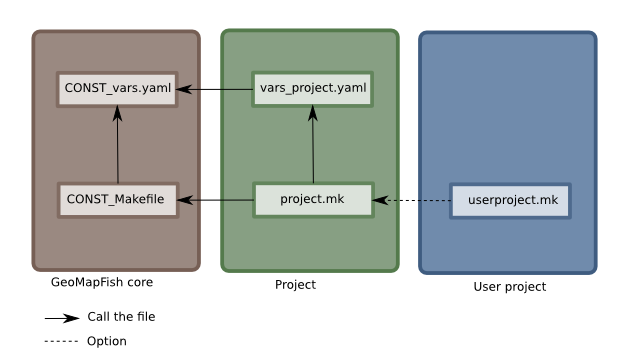
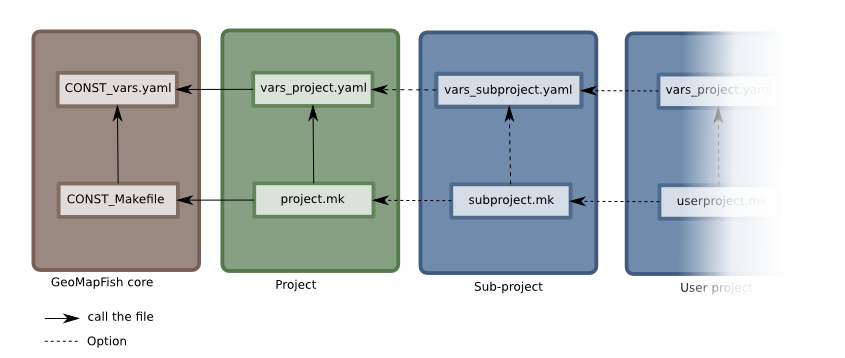
Hierarchy and extending your configuration files
The configuration files (Makefile and vars) have a hierarchy between them. These files extend other files. A Makefile extends another Makefile and similarly a vars file extends another vars file. This extension is visible in Makefile files:
include CONST_Makefile
and vars files:
extends: CONST_vars.yaml
CONST files are files that should not be changed because they are replaced during application updates, so your changes will be systematically lost. You can extend these files as many times as you like, although it is not recommended to exceed 3-4 levels for readability and simplicity.
Whenever possible, it is strongly advised not to extend the
vars_<project>.yaml file, and we recommend that you use dynamic variables as
described below. However some use cases may need to do so:
- Configuring really different environments.
- Configuration of a multi-project (see below for this specific use case).
Use of dynamic variable
Variables used in the application configuration files (files vars_<project>.yaml)
can be made dynamic by means of environment variable. In the main file
vars_<project>.yaml, added the interpreted block at the bottom of the
file.
In this same file, you can change the value of a parameter by putting it in
uppercase (example: host: HOST). This parameter must be listed in the
interpreted parameters section:
extends: CONST_vars.yaml

vars:
    host: HOST
...
interpreted:
    environment:
        - log_level
        - host
In the <project>.mk file, add parameters you want to change as exported
parameters:
export HOST = domaine.different.com
export LOG_LEVEL
In the Makefiles that extend this main file, you only need to define the environment variables:
export HOST = prod.different.com
Configure the application
As the integrator you need to edit the vars_<package>.yaml and
<package>.mk files to configure the application.
Do not miss to add your changes to git:
git add vars_<package>.yaml
git commit -m "Configure the project"
git push origin master
Note
If you use the check collector do not miss to add the new child to the parent site check_collector configuration.
Note
Additional notes for Windows users:
To have a working PNG print you should get and edit the file
print/WEB-INF/classes/imagemagick-mapfish-spring-application-context-override.xml,
get it:
wget https://raw.github.com/mapfish/mapfish-print/master/sample-spring/imagemagick/WEB-INF/classes/imagemagick-mapfish-spring-application-context-override.xml
mv imagemagick-mapfish-spring-application-context-override.xml print/WEB-INF/classes/
git add print/WEB-INF/classes/imagemagick-mapfish-spring-application-context-override.xml
and replace the lines:
<!-- <property name="cmd">
    <value>C:\Program Files\ImageMagick-6.7.8-Q16\convert</value>
</property> -->
by those ones:
<property name="cmd">
    <value>C:\Program Files\ImageMagick-6.7.8-Q16\convert</value>
</property>
with the right path to convert.
After creation and minimal setup the application is ready to be installed. Then follow the sections in the install application guide:
Note
After that if you want a default theme you can run:
.build/venv/bin/create-demo-theme
Note
If you create the main instance you should do the whole database creation as described in Install an existing application, except the ‘Get the application source tree’ chapter.
Create a multi-instance project
In some cases we want to create applications based on very similar code and settings.
To be consistent with c2cgeoportal terminology we will use the words project to refer to the whole project and instance for a dedicated configuration of the project.
Multi-instance project use the concepts describe above:
This procedure will deal with:
- One folder per instance
mapfile/<instance>. - One configuration file for the project
vars_<project>.yaml. - One configuration file for each instance
vars_<instance>.yaml. - One make file for the project
<project>.mk. - One make file for each instance
<instance>.mk. - One Makefile generator for each developer and server
<user>.mk. - One additional CSS file for each instance
<package>/static/css/proj-<instance>.css.
Create the project
- Configure the instances in
vars_<package>.yamlas follows:
vars:

    ...
    instance: INSTANCE

    external_themes_url: http://{host}/{parent_instanceid}/wsgi/themes

    tiles_url: http://{host}/{parent_instanceid}/tiles

    instances:
    - instance: a name
    ...

interpreted:
    environment:
    - instance
Create the
<instance>.mkfiles:INSTANCE = <instance> VARS_FILE = vars_$(INSTANCE).yaml include <package>.mk
In
<package>.mkadd a custom CSS and a task to generate the make files:
CSS_BASE_FILES += <package>/static/css/proj-$(INSTANCE).css
CONFIG_VARS += viewer
export INSTANCE
- Define the developer templates as follows (
<user>.mk):
INSTANCE_ID = <user>_$(INSTANCE)
DEVELOPMENT = TRUE
include $(INSTANCE).mk
- Define the host templates as follows (
main.mk,demo.mk,prod.mk):
INSTANCE_ID = $(INSTANCE)
include $(INSTANCE).mk
- Create a
vars_<instance>.yamlfile with:
extends: vars_<project>.yaml

vars:

    # custom instance-specific variables for the viewer
    viewer:
        page_title: <title>
        initial_extent: [<min_x>, <min_y>, <max_x>, <max_y>]
        restricted_extent: [<min_x>, <min_y>, <max_x>, <max_y>]
        default_themes:
        - <theme>
        feature_types:
        - <feature>

    # overwrite project settings
    functionalities:
        anonymous:
            print_template:
            - <template>
- In the
<package>/templates/index.htmlfile do the following changes:
-        <meta name="keywords" content="<package>, geoportal">
-        <meta name="description" content="<package> Geoportal Application.">
+        <meta name="keywords" content="${request.registry.settings['instance']}, geoportal">
+        <meta name="description" content="${request.registry.settings['viewer']['page_title']}.">

-        <title><project> Geoportal Application</title>
+        <title>${request.registry.settings['viewer']['page_title']}</title>

...

         <link rel="stylesheet" type="text/css" href="${request.static_url('<package>:static/css/proj-widgets.css')}" />
+        <link rel="stylesheet" type="text/css" href="${request.static_url('<package>:static/css/proj-%s.css' % request.registry.settings['instance'])}" />
- Create the instance CSS file
<package>/static/css/proj-<instance>.css:
#header-in {
    background: url('../images/<instance>_banner_left.png') top left no-repeat;
    height: <height>px;
}
header-out {
    background: url('../images/<instance>_banner_right.png') top right no-repeat;
    background-color: #<color>;
    height: <height>px;
}
- In the files
<package>/templates/api/mapconfig.js, <package>/templates/viewer.jsand<package>/templates/edit.jsdefine theWMTS_OPTIONSurl and extent as follows:
- In the files
var WMTS_OPTIONS = {
   url: '${tiles_url}',
   ...
}

...

<%
initial_extent = request.registry.settings["viewer"]["initial_extent"]
restricted_extent = request.registry.settings["viewer"]["restricted_extent"]
%>

var INITIAL_EXTENT = ${dumps(initial_extent)};
var RESTRICTED_EXTENT = ${dumps(restricted_extent)};
- In the
mapserver/c2cgeoportal.map.makofile add the following line:
INCLUDE "${instance}.map"
- Edit
deploy/deploy.cfg.makoas follows:
 [DEFAULT]
-project = <package>
+project = ${instance}

 [code]
-dir = /var/www/vhosts/<project>/private/<project>
+dir = /var/www/vhosts/<project>/private/${instance}

 [apache]
-dest = /var/www/vhosts/<project>/conf/<project>.conf
-content = Include /var/www/vhosts/<project>/private/<project>/apache/*.conf
+dest = /var/www/vhosts/<project>/conf/${instance}.conf
+content = Include /var/www/vhosts/<project>/private/${instance}/apache/*.conf
Update the deploy configuration as follows:
git mv deploy/hooks/post-restore-code{,.mako}Then edit it (deploy/hooks/post-restore-code.mako):
-make -f $TARGET.mk template-clean
-make -f $TARGET.mk template-generate
+INSTANCE=${instance} make -f $TARGET.mk template-clean
+INSTANCE=${instance} make -f $TARGET.mk template-generate
Result
Now you can configure the application at instance level in the following places:
mapserver/<instance>.map<instance>.mkmandant/static/images/<instance>_banner_right.pngmandant/static/images/<instance>_banner_left.pngmandant/static/css/proj-<instance>.cssvars_<instance>.yaml
Then run the make command for the user/instance you want to setup:
INSTANCE=<instance> make -f <user>.mk build
And to switch to an other instance:
INSTANCE=<instance> make -f <user>.mk template-clean
INSTANCE=<instance> make -f <user>.mk build
Dynamic configuration and autogenerated files
Several files are autogenerated, their content depending of the variables you
have set either in the main <package>.mk or a <user>.mk
The files can have either the extension .in or .mako
.mako (recommanded)
If you use .mako, you can also use all the possibilites allowed by the Mako
templating system, such as for loops, conditions, sub-templates, etc.
Please see the Mako documentation for details:
http://docs.makotemplates.org/en/latest/
The result is also a file without the .mako.
Syntax
In .mako files, the variable replacement syntax is as follows:
${<variablename>}
for example:
${instanceid}${directory}
.in (deprecated, for backward compatibility)
If you use .in, the variables are simply replaced and a file without the
.in extension is generated.
Syntax
In .in files, the variable replacement syntax is the same as in .mako files.
But we can get only the non structured variable.